Wednesday, August 23, 2017

Copy and Play DVD Movies on Blu-ray Player

Can Blu-ray player play DVD disc?

Today, many Blu-ray player manufacturers have also included the ability for their units to playback standard DVDs, this means that your current DVD library is playable on a Blu-ray Disc player. Also, when you play a standard DVD in a Blu-ray Disc player, you can view it at standard DVD resolution or have the player upscale the DVD playback signal to match 720p/1080i/1080p or even 4K mode(some Blu-ray Disc players provide 4K upscaling) that will be a better match for viewing on an HDTV or 4K Ultra HD TV.

Rip or Copy DVD movies for Blu-ray Player viewing

Sometimes, to keep your precious DVD disc from scratched or damaged due to frequent playback in Blu-ray player or conveniently playing your favorite DVD movies on Blu-ray player without rifling through your collection and swapping the discs, you will wish to copy or rip DVD disc into digital file formats for viewing on Blu-ray player.

To make digital copy from DVD movies, what you need is a DVD copy software. Here, you can easily get the job by download Pavtube DVDAid, which has full support for loading DVD disc, Video_TS folder and DVD IFO/ISO image file. The program can assist you to automatically bypass the DVD copy protection and region code in the background with the built-in disc decrypter, you can then make a free disc copy or ripping.

As for the output file format, you can make a full disc copy of DVD movies with all your unwanted menus, features, chapters, etc to save as a Video_TS folder or make a fast main movie copy in VOB file format to leave out the unwanted extras such as comments, trailers, ads, etc. You can also check your Blu-ray player's user manual to see what digital file formats can be played on it and then use our program to rip DVD to Blu-ray player compatible digital file formats.

For Mac users, please switch to download Pavtube DVDAid for Mac to perform the same conversion on macOS High Sierra, macOS Sierra, Mac OS X El Capitan, Mac OS X Yosemite, etc.

Get Pavtube DVDAid for Windows/Mac with 20% off discount, coupon codec: 45K2D47GJH

How to Copy or Rip DVD Movie for Blu-ray Player Viewing?

Step 1: Import DVD Movies.

Download, install and run this DVD ripper. You can load DVD by clicking "File" > "Load from disc". Or load DVD Folder by clicking "File" > "Load from folder" or load DVD IFO/ISO image by clicking "File" > "Load IFO/ISO".

Load DVD movies

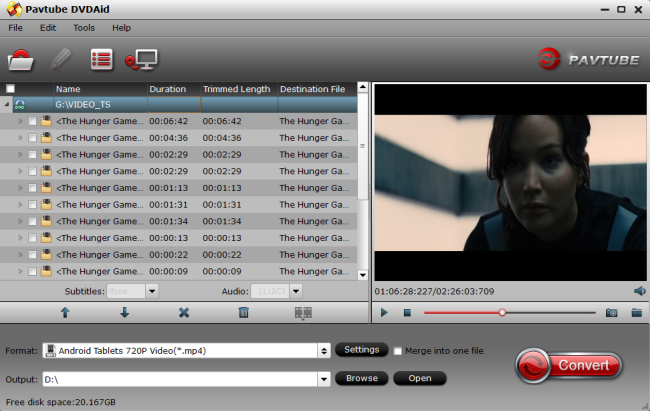
Step 2: Copy or rip DVD movies.

Full disc copy

On the top tool bar of the main interface, use the  option to make an entire disc copy of original DVD structure without changing anything.

Main movie copy

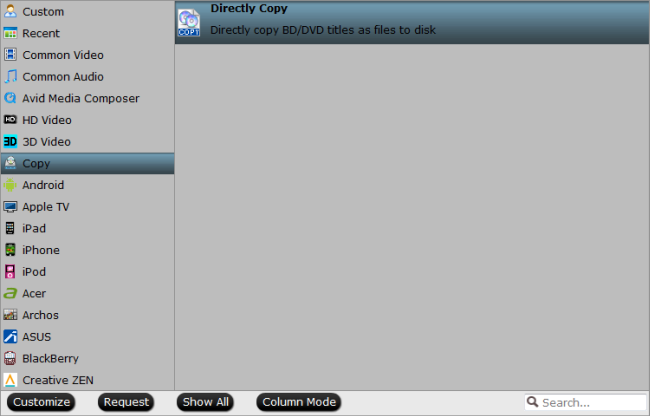
From "Format" bar drop-down list, select "Copy" > "Direct" Copy, you can then copy the selected movie file in its original format without quality loss. When directly copy a DVD video, you will get .vob as output.

Main movie of DVD copy

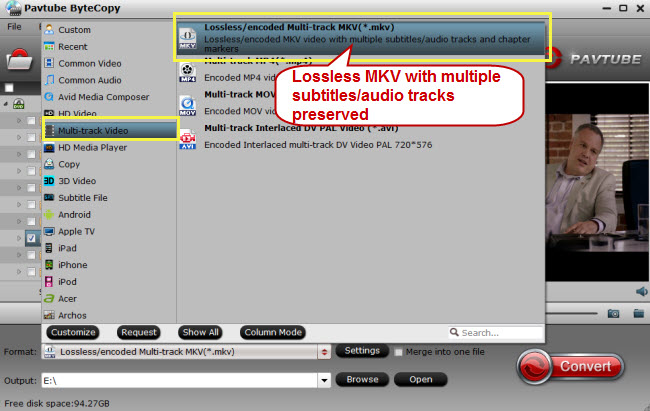
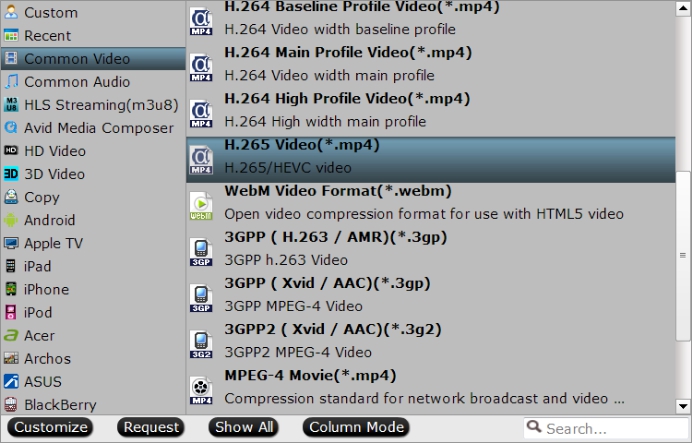
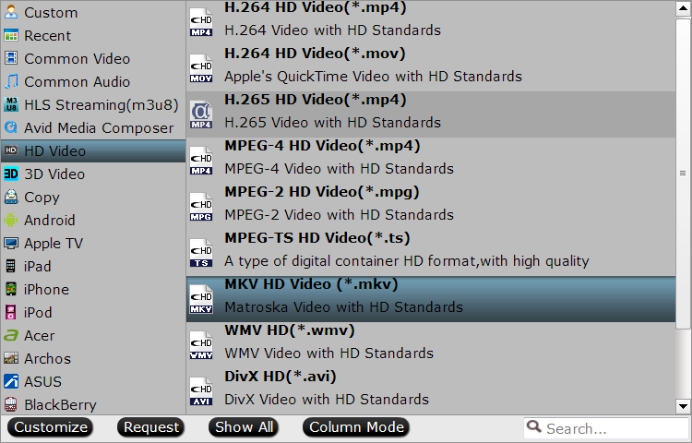
Rip DVD to Blu-ray player supported digital formats

Choose to select one of your Blu-ray player listed on its user manual as the final output file format.

Output Blu-ray player supported digital file format

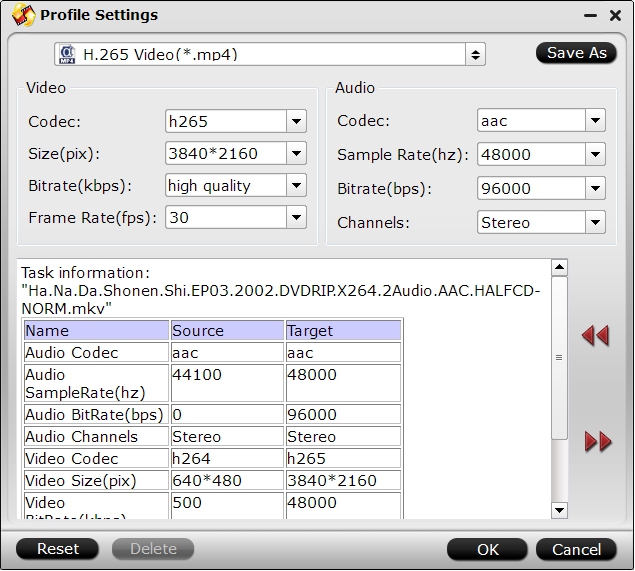
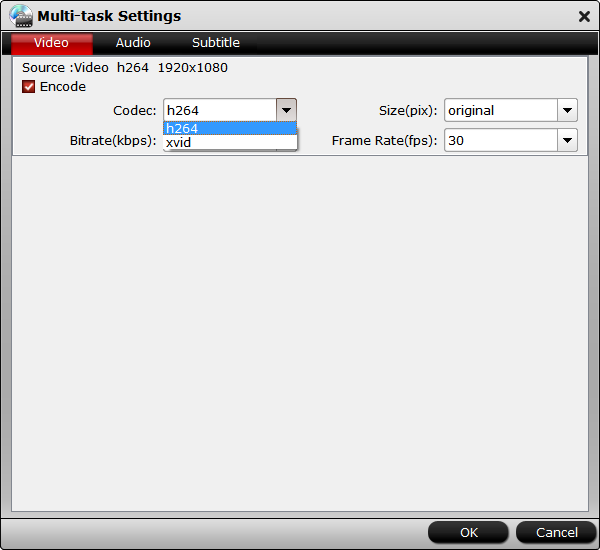
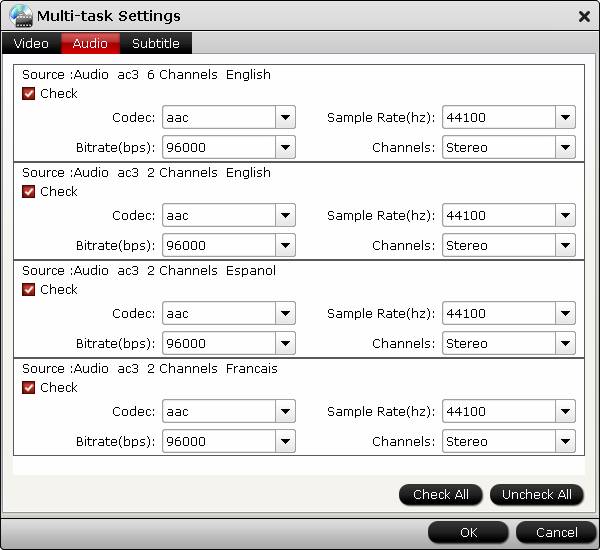
Tips: Click "Settings" on the main interface to open "Profile Settings" window, here, you can flexibly choose or specify exactly the profile parameters including video codec, resolution, bit rate, frame rate, audio codec, bit rate, sample rate, channels, etc as you like to get better output video and audio quality.

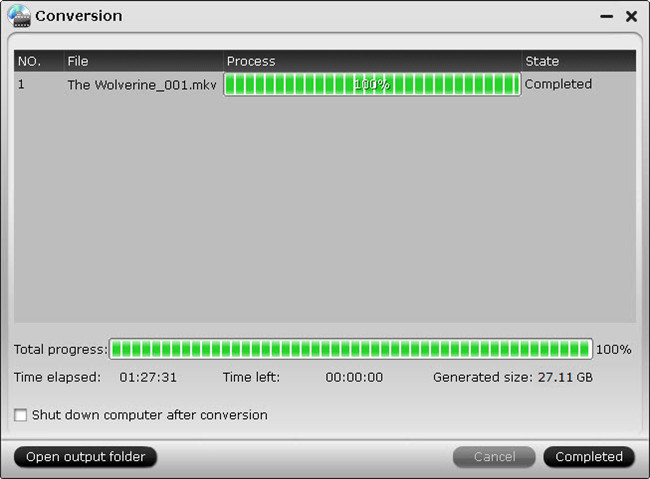
Step 3: Begin the copying or ripping process.

After all setting is completed, hit the "Convert" button at the right bottom of the main interface to begin DVD movie to Blu-ray player copying or ripping process.

When the conversion is finished, click "Open Output Folder" icon on the main interface to open the folder with generated files. Then you can conveniently view any of your favorite DVD movies on Blu-ray player with no damage to DVD disc.

Wednesday, August 16, 2017

Backup Blu-ray Movies to Synology DS216Play

The Synology DS216Play offers a maximum storage capacity of up to 16TB, you can store a large number of files that can be accessed and managed from nearly anywhere. For Blu-ray movie collections, it would be a good option for you to backup Blu-ray movies to Synology DS216Play, so that you can conveniently access the Blu-ray movies on Windows computer, Mac, iOS, Android and Windows Phone. The following article will show you how to backup or rip Blu-ray to DS216play for better usage.

Backup Blu-ray movies to Synology DS216Play

Although Synology DS216Play has no specific requirements on the file formats stored on it, however, as for commercial Blu-ray movies, it would be another story. The main reason is that the complicated copy protection and region code on Blu-ray disc makes it difficult for you to copy the content on Blu-ray movies to Synology DS216Play. The good news is that you can bypass that protection with a powerful Blu-ray Ripper application.

Best tool to copy Blu-ray movies to Synology DS216Play

Although there are many Blu-ray Ripper software can assist you to complete the job, however, if you are looking for a powerful program that can remove all Blu-ray copy protection and region code, we highly recommend Pavtube ByteCopy to you. Besides that, the program also keeps constant update with perfect support for the new MKB61 and MKB62 encryption used on many recently released Blu-ray disc, BDMV folder and Blu-ray ISO image file.

With the program, you can backup Blu-ray movies to DS216Play in the following 5 different ways:
- 1:1 full disc copy of Blu-ray to computer hard drive with all subtitle languages, audio tracks and chapter information well preserved.
- Directly Copy main movie from Blu-ray discs and leave out unwanted extras such as comments, trailers, ads, etc.
- Get a complete MKV file out of Blu-ray or DVD source and desired audio streams and subtitle tracks are preserved with almost same HD quality.
- Rip Blu-ray to popular digital HD file formats including H.264 HD MP4, H.264 HD MOV, H.265 HD, MPEG-4 HD MP4, MPEG-2 HD, MPEG-TS HD, MKV HD, WMV HD, Divx HD, AVI HD, BDAV HD, etc or SD file formats
- Output iPhone, iPad, Android phone or Windows Phone preset profile formats from Blu-ray movies.

Step by step to Copy/Backup Blu-ray Movies to Synology DS216play?

Step 1: Load Blu-ray disc.

Insert the Blu-ray disc into your computer's Blu-ray drive. If your computer doesn't ship with a drive, you will need to purchase an external USB Blu-ray drive to read on the data on Blu-ray disc. Then press "File" > "Load from disc" option on the main interface, alternatively, you can also import Blu-ray folder or Blu-ray ISO files with the program.

Load Blu-ray disc

Step 2: Backup Blu-ray/DVD to Synology DS216Play.

Full disc copy

Make a full disc copy by hitting the full disc copy icon on the top tool bar of the main interface.

Main movie copy

From "Format" bar, select "Copy" > "Direct Copy" to copy the main movie of the Blu-ray disc.

Direct Copy

Lossless Multi-track MKV copy
Get a complete MKV output from Blu-ray by following "Multi-track Video" > "Lossless/encoded Multi-track MKV(*.mkv)".

Lossless multi-track MKV copy

Step 3: Rip Blu-ray for Device streaming with DS216play.

Click "Format" bar to select "HD Video" > "H.264 HD Video(*.mp4)" which is the most compatible file format which works on iPhone, iPad, Apple TV, Android phone/tablets and Windows phone and tablets, etc.

Output popular digital file format

Step 4: Start the Blu-ray to Synology DS216play backup process.

Go back to the main interface, press right-bottom "Convert" button to start Blu-ray movie to DS216Play copy or digital format conversion process.

When the convesion is completed, you will have no limitation to stream your favorite Blu-ray movies and TV shows from Synology NAS DS216play to any supported devices as you like.

Friday, August 4, 2017

How to Stream 4K Video to Roku via Plex 

4K Ultra HD gives you a better viewing experience by increasing the pixel resolution – it’s four times that of HD! Nowadays, big-budget films (and an increasing number of TV series) are being filmed in 4K, and you can also record some 4K footage with 4K capable camera or camcoder. For 4K video lovers, you may wish to watch the 4K videos on Roku via Plex so that you can conveniently and remotely control the designed interface from your couch. However, although the Roku Ultra, Roku Premiere+, Roku Premiere and 4K Roku TV models all support streaming 4K up to 60 (fps to give you smooth and clear motion no matter how frantic the car chase or drawn-out the instant replay), the Roku only supports a limited number of local media files like MP4 (H.264) & MKV (H.264) video / AAC & MP3 audio / JPG & PNG image). It indicates that you may fail to stream some 4K videos to Roku via Plex, such as XAVC S, Prores, MXF,etc.

What media file types does the Roku Media Player channel support? 

Video — H.264/AVC (.MKV, .MP4, .MOV), on Roku 4 only: H.265/HEVC (.MKV, .MP4, .MOV); VP9 (.MKV)

Audio – AAC (.MKV, .MP4, .MOV); MP3(.MP3, .MKV); WMA (.ASF, .WMA, .MKV), FLAC (.FLAC, .MKV), PCM (.WAV, .MKV, .MP4, .MOV), AC3/EAC3 (.MKV,.MP4. .MOV, .AC3), DTS (.MKV, .MP4, .MOV), ALAC (.MKV, .MP4, .MOV, .M4A)

By installing Plex Media Server on your computer and then run the Plex channel on your Roku media player, you will also need to know what media formats are supported by Plex Media Server.

Stream incompatible 4K video to Roku via Plex

To stream any 4K video to Roku via Plex, the best solution is transcoding 4K video to the format and profile settings listed above. Pavtube Video Converter for Windows/Mac  can beneficially convert any 4K videos with various different container and codecs to Roku native compatible H.264 or H.265 codec with MP4 container. In addition, you are also given the chance to adjust output file resolution, frame rate, bit rate to get the optimal 4K streaming settings for Plex app on Roku.

What's worth mentioning here is that the program has upgraded with perfect support for H.265 encoding acceleration, you can transcode 4K videos to 4K H.265 with up to 30x faster speed on a PC computer with a Nvidia Graphic Cards that supports Nvidia NVENC technology.

Step by Step to convert 4K videos for Roku Playing from Plex

Step 1: Import 4K video files.

Download and install this program on your computer. Get it running, then on the top menu, click “File” > “Add Video/Audio” or “Add from folder” to import 4K video files to the program.

Import 4K video files

Step 2: Output Roku Plex app supported 4K format

From “Format” drop-down list, scroll down the main category list on the left, navigate to “Common Video”, from its extended list on the right, specify to output “H.264 Baseline Profile Video (*.mp4)”. If you are using Roku 4, "H.265 Video (*.mp4)” is suitable for you.

Output Plex app for Tivo Bolt supported 4K format

Step 3: Adjust output video codec, size, bit rate, etc.

Click “Settings” to open “Profile Settings” window, set the output video codec as H.264 or H.265, “Size(pix)” as “3840*2160″, frame rate as 30fps, video bit rate as 8kbps to get optimal 4K streaming settings for Plex app.

Adjust output profile settings

Step 4: Begin the conversion process.

After all setting is completed, hit right-bottom "Convert" button to begin the conversion from 4K videos to Roku playable 4K H.264 or 4K H.265 format encoding process.

When the conversion is done, open output folder, find the generated files and add converted files to plex app for streaming on Roku for free playback.

Source Article: How to Stream 4K Video to Roku via Plex 


Thursday, July 27, 2017

Fix VLC 4K Video Playback Issues

Have problem to play 4K video with VLC media player due to the format incompatible issues or suffer 4K video stuttering issues when view them with VLC media player, the following article will offer you two solutions to help you to realize 4K video playback on VLC Player!

Solution 1: Try to use VLC alternative to play 4K video

VLC can't satisfy your demands to smoothly playback 4K video, the good news is that there are other powerful 4K Video player alternative to perfectly handle 4K video playback.

Top 1: Media Player Classic and K-Lite Codec Pack

By installing Media Player Classic as well as the K-Lite Codec Pack, you can play 4K videos with Media Player Classic. The lightweight nature of MPC itself allows the software to be used on even the oldest of computers - although to playback in 4K video you will require a more powerful system.

Top 2: Divx Player

DivX Player is another HD video player, supporting high-quality video playback up to 4K. It is optimized for playing videos in MKV, HEVC (H.265), AVI, MP4, DIVX and more. While playing 4K videos via DivX, you can fast forward or rewind to your wanted time point quickly, select chapter, create playlist based on your own needs, and switch seamlessly among soundtracks to hear other languages. And Resume Play enables you to jump right back into the scene you left off quickly.

Top 3: Sony 4K Ultra HD Media Player

It is able to download 4K movies,stream Netflix in 4K resolution and playback 4K media contents. It brings much more than its price suggests, with a price of $699.99.

Editor's choice:

If you fail to open certain 4K video with VLC Media Player or still suffer video lagging or stuttering issue when playing 4K video with above listed 4K video player, then it is essential for you to download a 4K Video Converter to convert 4K video to VLC best compatible file formats.

Solution 2: Convert 4K Video to VLC with 4K Video Converter

Since the majority of playback work is still being finished in 1080p, in most cases, we still need to downscale most of the Ultra HD 4K to 1080p or 2K properly to fit your VLC Player. Plus, this professional 4k video converter - Pavtube Video Converter features strong ability to compressing 4K UHD videos to 1080p, 2k faultlessly and converting 4K UHD videos to MP4, MOV, AVI, WMV, MPEG4, H264, MKV and other existing video types. Thanks to the built-in video editor, you can trim, crop and retouch your videos in clicks. Overall, this program is a completely professional 4K HD video converter, player and editor.Convert & Downscale 4K to VLC Media Player for playback

For Mac users, you can download Pavtube Video Converter for Mac to convert and compress 4K to VLC on macOS Sierra or its previous version.

Step by Step to Convert 4K Video for VLC Playbacl

Step 1: Load 4K Videos.

Launch the 4K to VLC Converter; click "Add" and load your 4K HD files. Or directly drag and drip your 4K source to the program.

Load 4K video

Step 2: Choose output format

Press the drop-down box named "Profile" and select a format you need for VLC Player. There are several options that include MPEG-2, WMV, MPEG-4, MKV and many others each designed with their own encoding types.

Output VLC supported file formats

Tips: And by clicking Edit, you can trim, crop videos, adjust video effects, add watermarks, etc.

Step 3: Set Video Resolution at 1080p or 2K

Click "Settings" button; you can adjust video and audio settings, including codec, aspect ratio, bit rate, frame rate, sample rate, and audio channel. To down-convert ultra HD 4K to 1080p, do remember adjusting video size to 1920*1080. That is the exact 1080p. If you want to downsize 4k to 2k, you are advised to set video size as 2048×1080.

Step 4: Start 4K to VLC conversion

Hit "Convert" button to start downscaling and encoding 4K files for VLC Player. After the conversion, tap the Open icon in the main interface and you can locate the converted files there. Just add the files to your VLC, and you can play the converted 4K videos on VLC easily without any issues.

Friday, July 21, 2017

Streaming Videos to SkyStream One Android TV Box

SkyStream One Android TV Box is the sleekest, fastest, and most powerful model under the brand. It is perfect for those who want quality content without compromise. With the fully loaded Skystreamx Android TV Boxyou will be able to stream films or TV shows at the highest quality, minus the poor reception and inconvenience of installing and tweaking Kodi add-ons experienced with other Android set-top boxes. If you've just purchased a SkyStream One Android TV box and want to use it as a media player, you are in the right place. Below article will show you how to stream all videos to SkyStream ONE Android TV Box  for enjoyment.

How to play video files on your SkyStream ONE Android TV box?

If you have some local media files and want to stream them to SkyStream ONE Android TV Box for enjoyment, just follow the next guide:

1. Sign into your Google account and head to the Play store. Once in the play store search for MX Player or VLC Player. Select either one and install. Once the app has been installed click on open.

2. The next time you play an local media file you'll be asked which app to open it with. Select the app you downloaded and then select always use this app and you will be able to continue watching all your favourite videos via SkyStream ONE Android TV box.

Note: If you don't have a Google account, you can use the browser on the box head to google and search for “MX player Android” or VLC Player Android” and click on the link. You will be taken to the Android store in the browser. Click on the download link. Head to app installer.

SkyStream One Android TV Box supported Audio & Video Formats

From the SkyStream Quick Start Guide & Manual, we know that SkyStream One Android TV Box has limited formats playback compatibility. Supported Audio & Video formats are listed as below:

Video Resolution: Up to 4k x 2k, 3D-HD(1080Px2), 1080P, 720P, 480P

Video Codec: MPEG-1 MP/HL, MPEG-2 MP/HL, MPEG-4 Part 2, ASP, WMV/VC-1 SP/MP/AP, H.264 HP@L4.1, H.265, REAMDEO 8/9/10, M-JPEG & JPEG

Video Format: MPEG, MPE, MPG, M2V, ISO, TS, VOB, DAT, AVI, MKV, MP4, MOV, 3GP, 3GPP, FLC, WMV, FLV, RM

Audio Codecs: ACC, AC-3, ADPCM, AMR-NB, MIDI, MP2, MP3, MS-ADPCM, PCS, RV40 Vorbis WMA, AAC+ (HE-AAC vi), eAAC+ (HE-AAC v2)

View incompatible video formats on SkyStream One Android TV Box

If the video files your own are not the format that's supported by SkyStream One Android TV Box, you will fail to watch them on SkyStream One Android TV Box. To fix this issue, what you need is just a simple media conversion application. After Google Internet searching, you may find Pavtube Video Converter Ultimate for Windows /Mac can do the job better for you than other competitors. It can comprehensively rip both Blu-ray and DVD with copy & region protection but also convert online downloaded videos and your own recorded videos in various different file formats to SkyStream One Android TV Box readble AVI, MKV, MP4, FLV, etc formats for convenient playback.

Good news: Buy Pavtube Video Converter Ultimate right now with 20% off discount, coupon codec: 45K2D47GJH

This software also provides a trial version for each user, which is totally free. Now, just download this perfect application and follow the next guide to stream all video files to SkyStream One Android TV Box for playback.

How to convert Videos to SkyStream One Android TV Box?

Step 1: Load video files to Pavtube Video Converter Ultimate

Launch the program on your computer, click "File" menu, from its drop-down list, click "Load Video/Audio" or "Add from Folder" option to import video source files to the program.

You can also select "Load from disc" to load Blu-ray or DVD disc from optical drive, when both Blu-ray and DVD exists, the software will load DVD. 

Load Blu-ray/DVD or video source files

Step 2: Specify output file format.

Click "Format" drop-down list, scroll down the main menu on the left, select "HD Video", from its extended option list, choose "MKV HD Video (*.mkv)" as the desired output format for SkyStream One Android TV Box playback, you can also choose other compatible format according to your own needs.

Define output profile format

Tips: Click the “Settings” icon and you will go into a new interface named “Profile Settings”. You can adjust codec, aspect ratio, bit rate, frame rate, sample rate and audio channel in the interface according to your needs and optimize the output file quality.

Step 3: Begin the final conversion process

After you have define the output format, go back to the main interface, hit right-bottom convert button to start to convert any video for playing on SkyStream One Android TV Box. When the conversion is done, click "Open Output Folder" on the main interface to pop out the folder with generated files, then stream these videos to SkyStream One Android TV Box.

1. Use Google Cast

Connect SkyStream One Android TV Box to internet via WiFi or network cable at first. Install Google Cast Extension for Chrome browser on computer or portable devices. Open the converted video files on a browser tab. Tap Google Cast icon and choose name of your Android TV. Click Full Screen button to play media files on Android TV with full screen view.

2. Use Video Streaming Apps

You can also download Google Cast enabled video/movie streaming apps for website, Android, iOS to cast converted video files to SkyStream One Android TV, for example Videostream.

Now, you can watching all video files on SkyStream One Android TV Box at anytime as you want with your friends and family.

Article source: Stream Videos to SkyStream One Android TV Box

Friday, July 14, 2017

3 Useful Tips to Play 3D Movies with VLC

For movie lovers who wish to watch 3D movies on computer, you don't need to download any additional software in your computer. The good news is that you can directly watch 3D movies with VLC media player on computer. The following article will share you 3 useful tips to play 3D movies with VLC.

Part 1:Watch 3D Movies with VLC
Part 2: Convert 3D Video with 3D Movie Converter
Part 3: Free 3D Video Player for Windows/Mac

Part 1: Watch 3D Movies with VLC

1. The first step is run 3D movie in your VLC media player.(Make sure that the movie you played must be SBS (Side-By-Side) 3D movie).
2. After that, Click on Tools and then select the Effects and Filters option from the drop down menu.
3. Now click on Video Effects tab and in this section click on Advanced tab.
4. In the Advanced tab, put a checkmark on Anaglyph 3D option.
5. Now you are ready to for watching 3D movies in the computer. Now, just put your Red/Cyan 3D glasses on and enjoy your 3D movie.

Part 2: Convert 3D Video with 3D Movie Converter

Want to turn all your personal media into VLC media player compatible 3D SBS format for viewing on it. You can easily make that with our powerful 3D Movie Converter - Pavtube Video Converter Ultimate for Windows/Mac to create VLC media player readable 3D SBS movie format from 2D/3D Blu-ray disc, DVD disc or digital video in virtually any file formats.

How to Create Side by Side 3D Movie for VLC Media Player Viewing?

Step 1: Input 2D/3D Blu-ray/DVD or digital video.

Start the application on your computer. For loading digital video, click "File" > "Add Video/Audio" or "Add from folder" (batch load multiple files) option. For loading 2D/3D Blu-ray or DVD disc, Insert your 2D/3D Blu-ray or DVD disc into your computer's optical drive , hit "File" > "Load from disc" option.

Input 2D/3D Blu-ray/DVD or digital video

Step 2: Define the output format.

Clicking the Format bar, from its drop-down list, select VLC media player compatible 3D SBS movie by following "3D Video" > "MP4 Side by 3D Video(*.mp4)", you can also choose 3D SBD MKV, AVI, WMV or MOV format according to your own needs.

Output VLC supported 3D format

Step 3: Start the final conversion process.

After all setting is completed, hit the "Convert" button at the right bottom of the main interface to begin the conversion process from 2D/3D Blu-ray/DVD to VLC media player compatible 3D SBS format conversion process.

When the conversion is finished, click "Open Output Folder" icon on the main interface to open the folder with generated files. Then feel free to enjoy the converted 3D movies with VLC media player on Mac computer.

Part 3: Free 3D Video Player for Windows/Mac

1. PowerDVD 16 Ultra

PowerDVD 16 is a very popular and old 3D video player software that enables you to play 3D videos in original quality. This software can easily play 3D videos and burn DVD as well. If you are looking to play 3D videos on your computer from your laptop, you can use PowerDVD 16 Ultra DVD software in TV and PC both modes. This software comes with a PowerDVD remote as well, allowing you to manage your movies, videos remotely from anywhere in your home.

2. 5KPlayer - Easiest to Use 3D Video Player

This best 3D video player is ranked by many users as it is the easiest to use program. Just as simple as playing 2D videos, no need to enable further settings to play 3D movies on Windows/Mac. Among all the free 3D video players, 5KPlayer can be said to be the uprising newbie in this field. It is a HD media player that delivers spectacular 3D experience combined with a slick performance and the ability to play and save Netflix 3D movies and download 3D videos 1080p, 720p in MKV, MP4, etc.

3. Bino Player - Efficient 3D Video Player

Bino is a quite professional 3D video player that plays stereoscopic 3D videos with a wide range of video format. It is free and efficient, and can work on both Mac and Windows. But it is experiencing current unstable development.

Thursday, July 13, 2017

How to Rip Blu-Ray in the Right Way?

For a long time I have ripped my movies for home use and have been fighting through many different programs of swinging character and swinging prisms. Most functionally work for specific purposes or have the great advantage of being free, but no one can do all tasks as well. There are programs like Makemaker that makes MKV files of your DVDs but can not handle Blu-Ray, Pavtube iMedia Converter that manages Blu-Ray but not in lossless format or with multiple audio and subtitle or Handbrake that's free but Which can not combine sections on a Series DVD / Blu-Ray and is quite slow.

For a long time I have also experimented with file formats and found that MKV is just becoming?the most useful format in all respects, so this guide focuses on an end result in MKV.

Additionally, I am tired of having to install different software to handle the different discs I would like to rip and should remember the different settings and procedures for each program.

I have chosen that ByteCopy from Pavtube should be my favorite tool as it has some obvious benefits when it comes to ripping. You can rip Blu-Ray and DVD on 2 methods. Either as lossless copy or as a converted encoded file with a less natural quality loss, but more importantly you can select multiple audio and subtitle tracks and you can encode them individually in the entire file to match your hardware setup as best as possible.?I personally rarely use lossless as it takes too much and would like my Blu-Ray into a 4-5 GB file for network playback for my ATV4.

Pavtube ByteCopy

So what can ByteCopy do? It looks like many of the other programs on the market when it rips and copies Blu-ray Disc and DVD movies to MKV. ByteCopy plays an irreplaceable role as the exclusive Blu-ray ripper that converts the main movie on Blu-ray, audio tracks and subtitles exactly as you want without compromising video and audio quality. When it encoder and diminish Blu-ray content, CUDA acceleration is turned on by default whenever possible and it gives a significant boost in speed.

Export file format: MKV
Video: H.264 / MPEG-4 AVC, VC-1, MPEG pass-through; H.264, Xvid, MPEG, VC-1 encoded
Audio: Dolby Digital, Dolby Digital Plus, Dolby TrueHD, DTS Digital, DTS-HD High-Def, DTS-HD MA Pass-through; Dolby Digital 5.1, DTS, AAC, MP3 encoded.

Method 1

Step 1. Blu-ray rip in Lossless Mode, ie a rip of Blu-Ray main movie with all original video, audio and subtitle tracks without changing anything. For those who have a lot of disk space and who do not want to compromise on anything. Start ByteCopy and load your disk by clicking the DVD / Blu-Ray button. The movie is now loaded (copy protected or not) and the main movie is automatically selected, but everything can be selected. Useful if you have plenty of space.

Load Blu-ray movies

Step 2. Click the converter button to start riping your Blu-Ray to MKV, with the main file, all audio and subtitle tracks. If you have finished ripping, you can click "Browse Export Path" to find the MKV file. TIP! You can change the output path under settings in the software. Then just wait

Start Blu-ray to MKV Ripping process

Under lossless (default) mode, Pavtube ByteCopy will convert Blu-ray movies to MKV without changing anything. All it takes is to rip the main movie file from the disk and pack it in an MKV container. You get lossless quality with all subtitles and audio tracks, because original video, audio and subtitles are preserved. In addition, you also keep chapter marks.

Method 2

Certainly the method I use most. It shreds the disc with the subtitles and audio tracks you want, while compressing the file to a somewhat more handy size without compromising on quality compromises. I will show you how to do this, but you can change the different parameters for what suits you best. I rip my movies for a setup with an NAS that streams to a jailbreaked ATV4 with Firecore media player installed. This gives the smallest file the exact content I want.

Step 1. Load the file from ByteCopy. The main movie is automatically selected.

Load Blu-ray movies

Step 2. Select the title in the window and click edit disk. You can now choose which audio tracks and subtitles you want. TIP! You can set your selection by default in ByteCopy's settings, so they are remembered each time. In addition, you can also select a specific player you want to rip to, so ByteCopy converts light and subtitles to file formats that are compatible with your player. I always use lossless and put my own choice of file types.

Select desired Blu-ray subtitles and audio tracks

Step 3. If it's only a specific part you want to rip (for example, only main), go directly to the selected track and click Title Settings. Here you can choose to rip in Full HD, or as I do just below HD. At Full HD, I recommend bitrate of 8000, at HD you can reach 6000. Is it a DVD you rip, then choose 720x576 in Size and you can beat a bitrate of around 2000. Remember to tick the Enco if you Will change the resolution and bitrate.

Customize video settings

Step 4. Next turn is the sound. I always start by clicking uncheck All, as I usually only want Danish and English audio. After checking the checkboxes you want, you can choose whether you want the Encode audio, or just keep it as it is in Source. I always keep it as ATV4?can handle DTSHD for a stereo TV speaker, but for some, it may be necessary to convert to a stereo track.

Remove unwanted audio tracks

Step 5. Then we are on subtitles. Again Unchecl All and select the subtitle (s) you want. I always choose Danish only, but some may want others too. When done, click OK, and click the MKV button to begin.

Remove unwanted subtitles

Then the task is created and ByteCopy starts calculating time and size based on your choices and the power of your computer. As you can see in the screenshots below, ByteCopy is quite accurate in its calculations, and only diverges a very small amount. The time you see listed is on a 2012 13 "Macbook Air, and I think it's quite good to be able to rip and compress / encode a Blu-Ray disc in less than 2 hours. Is it just a DVD, then we talk for half an hour.

Start Blu-ray movie copying process

ByteCopy is by far the best and fastest program I've tried. You can download a trial version from Pavtube, either ByteCopy for Windows or ByteCopy for Mac OS X. You can make 7 lossless rips with the trial and want to rip and encode to get a watermark on the movie. You can purchase the software for only $ 42 including unlimited lifetime upgrades. Enjoy.